13.4 The Processes of Adding Ingredients to Base Solutions
With completed calculations and labels per IV dose in hand, the technician needs to have the pharmacist compare them to the medication order to verify their accuracy before preparing the CSPs. A large portion of sterile compounding entails injecting the proper measurements of medications from vials and ampules into the prepackaged IV bag solutions. You have to work to master these skills, since withdrawing medications from vials and ampules with syringes and injecting them into IV bags or other containers requires complex manipulations. Aseptic technique must be followed, which requires training and practice. The following section gives an overview of the major steps in sterile compounding.
 Safety Alert
In compounding, stay free from interruptions to keep mentally focused on following proper aseptic technique. Any breach in technique may lead to product contamination and medication errors.
Sterile Compounding with Ingredients in Vials
A vial is a sealed glass or plastic sterile container with a rubber seal and hard plastic cap. Vials contain sterile diluents or medications in either a liquid or a powdered form and are commonly available in sizes ranging from 1 mL to 100 mL (for batch CSPs). Vials come as single-dose vials (SDVs), which do not contain preservatives, and multiple-dose vials (MDVs), which do contain preservatives. (Insulin often comes in MDVs.)
The vial label contains the stock drug’s concentration and the manufacturer’s directions for reconstitution or use (see Figure 13.6). Before using the vial contents, the expiration and in-use dates need to be checked.
Figure 13.6 Identifying the Components of a Medication Label
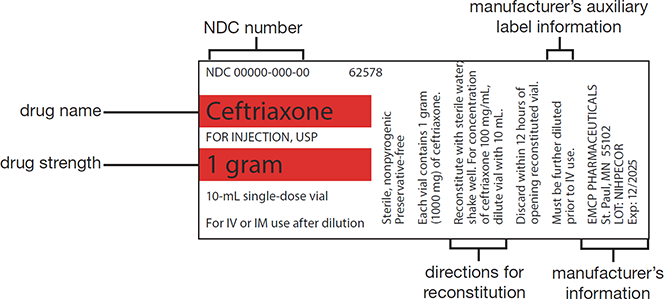
The absence of a preservative in an SDV makes this container an ideal medium for microbial growth, so the contents must be used within 12 hours of opening in the direct compounding area (DCA) and then be discarded. The contents of an MDV, on the other hand, are considered stable (with a preservative) for up to 28 days from its initial opening unless otherwise specified by the manufacturer. Once an MDV is opened, mark the beyond-use date and time on the MDV to ensure that the vial is stored under appropriate conditions (usually refrigeration) and to alert other pharmacy personnel of the opening and the medication’s change from an expiration to a BUD.
Withdrawing Fluid from a Vial
During sterile compounding in the DCA, all processes must be aseptically performed according to strict procedures dictated by the USP Chapter <797> and the facility’s standard operating procedures. The processes are complicated and must be practiced in a training lab. The vial’s flip-top plastic cap must be opened to expose the rubber top and wiped with a sterile 70% isopropyl alcohol (IPA) swab. Once the appropriate needle unit has been aseptically unwrapped and uncapped, the needle’s bevel must be carefully placed on the vial’s rubber top, with the bevel pointing up toward the ceiling at a 45-degree angle (see Figure 13.7). The needle tip should then be pressed to pierce and penetrate the rubber closure at this angle and then be straightened to 90 degrees and pushed down so that the bevel heel will enter the closure at the same point as the tip.
 Safety Alert
It is important to know if a patient is allergic to latex. If so, a vial with a latex-free rubber top is needed, or special tools to remove the contents from the vial.
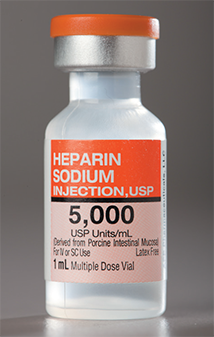
This sealed, sterile, multi-dose vial contains several doses of medication stabilized with a preservative.
Figure 13.7 Correct Needle Insertion into a Vial
Note the slight bend of the needle during the insertion.
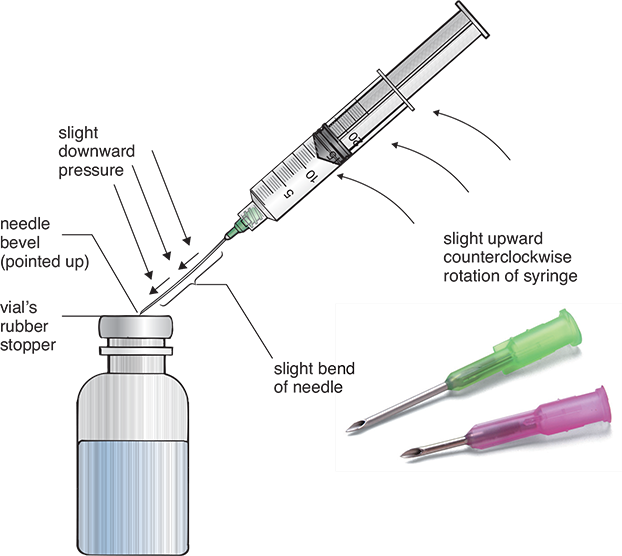
Vented needles have a wider slanted opening to allow flow of air with the insertion of the fluid. Lateral vented needles have air vents on the side of the lumen to prevent foaming from inserted air in the reconstituted medication.
 Practice Tip
During sterile compounding in the DCA, you must always hold the vial and syringe so that the airflow to the critical area—which includes the syringe tip, needle, and the vial’s rubber top—remains unobstructed.
This technique prevents coring, or the inadvertent introduction of a small piece of the rubber top into the solution. If coring does occur, you must discard the contaminated vial and needle-and-syringe unit and repeat the process with new supplies. Because a vial is a closed-system container, the air cannot freely flow in or out, so you must use a milking technique. For milking, use a syringe to insert a small amount of air into the vial that is equal to, or slightly less than, the volume of liquid needing to be withdrawn. Then draw up some solution into the syringe. This insertion and withdrawal process is done a little at a time in alternating steps, easing sufficient fluid into the syringe. (If the vial contains powdered medications, a vented needle is used to add the diluent. The vented needle, with its hole in the lumen, allows the fluid to be injected into the powder while simultaneously venting the positive pressure that has built up within the vial without milking. Vented needles are used when inserting a solution into a vial containing a powdered medication for reconstitution.)
Once the fluid measurement seems to be reached, the sides will have to be tapped to make the bubbles rise and be released so that only fluid is in the syringe. More fluid may be needed. When the correct amount of fluid is precisely measured, it may be injected into an IV or IVPB bag, or into an IV port for an IV push, or into another vial with powder for reconstitution.
 Safety Alert
Check the product package insert that accompanies each stock drug to verify which diluent and what volume should be added to the medication vial to make the correct concentration of a sterile medication.
Reconstituting Powdered Medication in a Vial Many antibiotics for parenteral solutions, such as cefazolin, are available as a lyophilized, or freeze-dried, powder. This allows the medication to have an extended expiration date and shelf-life, but it also means the powder has to be reunited with a fluid. Use a syringe (with vented needle) of the correct diluent, such as sterile water or normal saline, to perform this reconstitution. After injecting the diluent into the powder vial, the vial will need to be gently swirled, or mixed according to the manufacturer’s instructions, to dissolve the powdered medication and turn it back into a liquid medication for parenteral administration.
Inserting the Vial’s Contents into Compounded Sterile Products
The reconstituted liquid medication must be withdrawn by syringe to be added to an IV bag or used for an IV push or intramuscular (IM) administration. Once the correct dosage volume has been measured in the syringe (as explained earlier), its needle should be recapped. This can be done by the scoop method, which involves placing the needle tip into the inside of the cap and scooping it up before putting pressure on the cap to secure it. The capped syringe, IV bag, and vial should be laid out in the DCA for the pharmacist and/or the supervising technician to check the drug name and concentration, the base solution type and volume, and the volume in the syringe against the label and the medication order.
 Safety Alert
The special procedures of safe aseptic needle changing and vial swabbing must be learned through training to avoid contaminating the needle, fluid, or medication, or pricking yourself with the needle or putting a hole in the glove and your skin.
After this verification, the vial top or the IV injection port (if for an IV) must be swabbed with 70% IPA in the DCA. Then using proper aseptic technique, the needle must be inserted into the port and the medication injected into the base solution. The final CSP will be checked again before being approved and sent to the nursing floor.
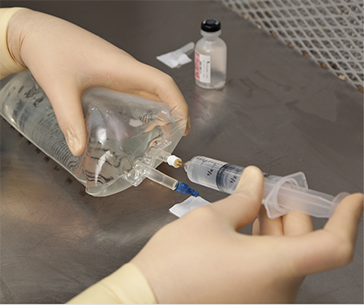
This shows the injection of a vial’s additive into an IV bag.
If you are preparing a syringe for nurse administration and you have withdrawn the reconstituted medication into the proper syringe, remove the needle and dispose of it in a sharps container. Then, cap the syringe with a sterile cap before labeling the syringe, having it checked and verified, and sending it to the nursing unit.
Preparing Ampule-Based Compounded Sterile Preparations
In addition to using medications from vials, you may also need to use medications stored in ampules. An ampule is a small, hermetically sealed sterile container. Made of thin glass, an ampule stores a single dose of sterile medication in either a liquid (most common) or a powdered form. You need to be aware that ampules contain no preservatives, and some drugs are available only as a solution in an ampule because these drugs are incompatible with the rubber top or any plastic sealing components of vials.

An ampule, with a neck ring for proper opening, contains no preservatives or ways to reseal the container, so any unused medication must be discarded.
Opening an Ampule
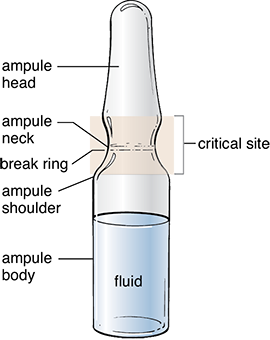
One must be familiar with the parts of an ampule to understand the directions on how to open this specialized container. An ampule has a head, an elongated neck, a shoulder, and a body (see Figure 13.8). Because it is a completely whole glass container without an opening, it is typically designed with a break ring. A break ring is a scored, or weakened, ring around the glass neck that marks the site where a technician will break it to access the ampule’s contents. Therefore, the process of opening an ampule has some inherent risks, including getting injured when breaking the glass, contaminating the medication with glass shards, and damaging and/or contaminating the hood with broken glass. You should be aware of these risks and should have sufficient training and practice in this skill before compounding CSPs.
Figure 13.8 Critical Site of an Ampule
Pharmacy technicians must not contaminate the critical site of an ampule through touch contamination or incorrect handling or positioning of the ampule within the hood.
 Practice Tip
All medications contained in ampules are considered single-dose only.
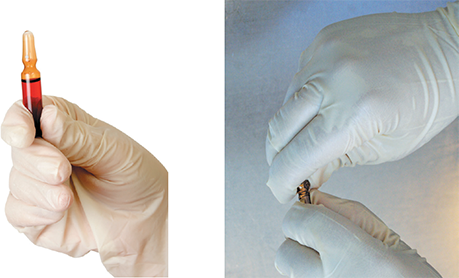
Before breaking an ampule, hold it upright and gently tap or swirl the container to clear the medication contents from the head and neck of the ampule. The neck must be wiped with a sterile 70% IPA swab to remove any microorganisms. Some technicians wrap a sterile 70% IPA swab around the neck of the ampule before breaking it. (Alcohol-soaked gauze may not be used, per USP <797> [rev. 2019].) Grasp the ampule body in your nondominant hand with thumb and fingers below the ampule neck. Position your other hand holding the top of the ampule with your thumbs on each side of the break ring, away from the critical site. Holding the ampule toward the side of the DCA away from the HEPA filter but still within first air, exert a gentle but firm pressure on the break ring by pushing both thumbs forward to snap the ampule’s neck cleanly towards the side wall of the hood (see Figure 13.9).
Figure 13.9 Opening an Ampule
With vial upright, gently tap the head to bring the medication down to the body. Swab the neck, and, if needed, use the swab to grip the ampule (though this is not the preferred method). If not, simply grasp it firmly. Then snap the neck away from you toward the inner side wall of the PEC.
Withdrawing Medication from an Ampule
Because you must break glass to access the medication, a filter needle or a filter straw must be used to withdraw the medication according to USP <797>. The needle or the straw must have a 5-micron (or finer) filter within its core to catch any microscopic glass shards to prevent them from entering the CSP. The filter needle or the filter straw should be attached to the syringe just like a regular needle.
To withdraw the medication, the ampule must be held upright in first air, and the filter needle bevel (pointing down) or the tip of a filter straw needs to be placed into the liquid surface to withdraw the liquid. Filter needles are for one-directional use only, meaning that the needle may be used only to withdraw fluid from an ampule or inject fluid into an IV or IVPB. The same needle may not be used to both withdraw from and inject into a container. When the ampule is nearly emptied, the technician should tilt the ampule slightly to allow easier access to the remainder of medication.
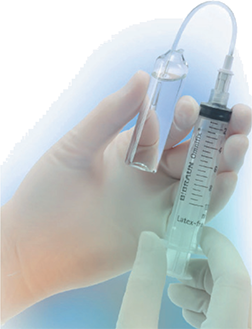
A filter straw can be used instead of a filter needle for withdrawing medication from an ampule. To see how to use one, watch the “Using the Filter Straw” video at https://PharmPractice7e.ParadigmEducation.com/FilterStraw.
Before injecting the contents of a syringe into an IV, change to a regular needle in the first air to avoid introducing glass or particles into the IV admixture. If a regular needle is used to withdraw the drug from the ampule, then the needle must be replaced with a filter device before the drug is pushed out of the syringe and into an IV or IVPB solution. Small glass fragment contamination has to be prevented, because it can lead to systemic side effects such as phlebitis (irritation of the veins), especially in pediatric and neonatal patients.
When the pharmacist verifies the dose in the DCA by checking the drug name and concentration against the medication order and the compounding label, the base solution type and volume, and the syringe volume, the pharmacist will also verify that you used a filter needle or straw to prevent the transfer of glass particles into the CSP.
Preparing Parenteral Nutrition Solutions
Since parenteral nutrition formulas are a mix of pharmaceutical and dietary elements, many hospitals have special parenteral nutrition teams comprised of specialized physicians, nurses, dietitians, and pharmacists who work together to design individualized patient medication orders and administration rates for these vulnerable patients. They monitor their progress to change the formula according to health progressions or declines. There are some general principles to know for preparing these CSPs.
 IN THE REAL WORLD
Numerous studies have been done about glass-related injuries resulting from medications made from glass ampules, including pain from phlebitis, organ inflammation, pain at the infusion site, and other issues. In a 1992 survey of postmortem studies of newborns who died after receiving medicated IVs from glass ampules without filter needles or straws, scientists found glass particles in the babies’ lungs. The glass particles caused pulmonary granulomas and hypertension in 5% of the late infants. The glass particles have also been known to cause immune system suppression and other harmful and sometimes fatal problems in newborns, children, and adults. Even so, filtered needles and inline filters in IV tubing are not consistently used with glass-ampule-based medications.
The USP, ASHP, and Infusion Nurses Society all recommend blunted filter needles when preparing medications from glass ampules. An analysis of the many studies on the dangers of nonfiltered medications from glass ampules can be found in the 2014 doctor of nursing thesis by Debran L. Harmon of the University of Northern Florida. This article can be seen at https://PharmPractice7e.ParadigmEducation.com/FilterNeedle.
Peripheral Parenteral Nutrition Components
PPN supplies only a portion of the patient’s daily nutritional requirements via a peripheral IV line, or a line to a vein in an arm or leg rather than in the chest. PPN is recommended for short-term use (less than 10 to 14 days). It decreases the risk of infection and is easier to use, compared with TPN. PPN is often used after a surgery before a patient is ready for full meals. The solutions are simpler to compound than TPNs, as PPNs have fewer ingredients. A PPN can be provided by a carbohydrate solution, such as D5W, or a fat emulsion.
Examples of commercially available parenteral intravenous fat emulsions (IVFEs) used for nutritional support are Intralipid 20% and Liposyn II/III (10%–20%). They are administered to patients who need more calories than can be supplied by maintenance carbohydrate solutions like dextrose solutions. Neither of these solutions contains important building blocks for protein, such as amino acids, which are important to maintain a good immune system.
Total Parenteral Nutrition Components
In contrast, TPN supplies all of the patient’s daily nutritional requirements, including proteins, amino acids, and electrolytes, via a catheter to a central vein (usually in the chest cavity). TPNs are recommended for longer-term use, generally defined as more than 14 days. TPNs are more expensive and have more potential complications, so they require more sterile compounding expertise than a PPN. TPN IVs are generally infused slowly over 24 hours in the hospital (and sometimes in home health care); hence the need for large volume IV bags holding 2,000 mL or more of solution.
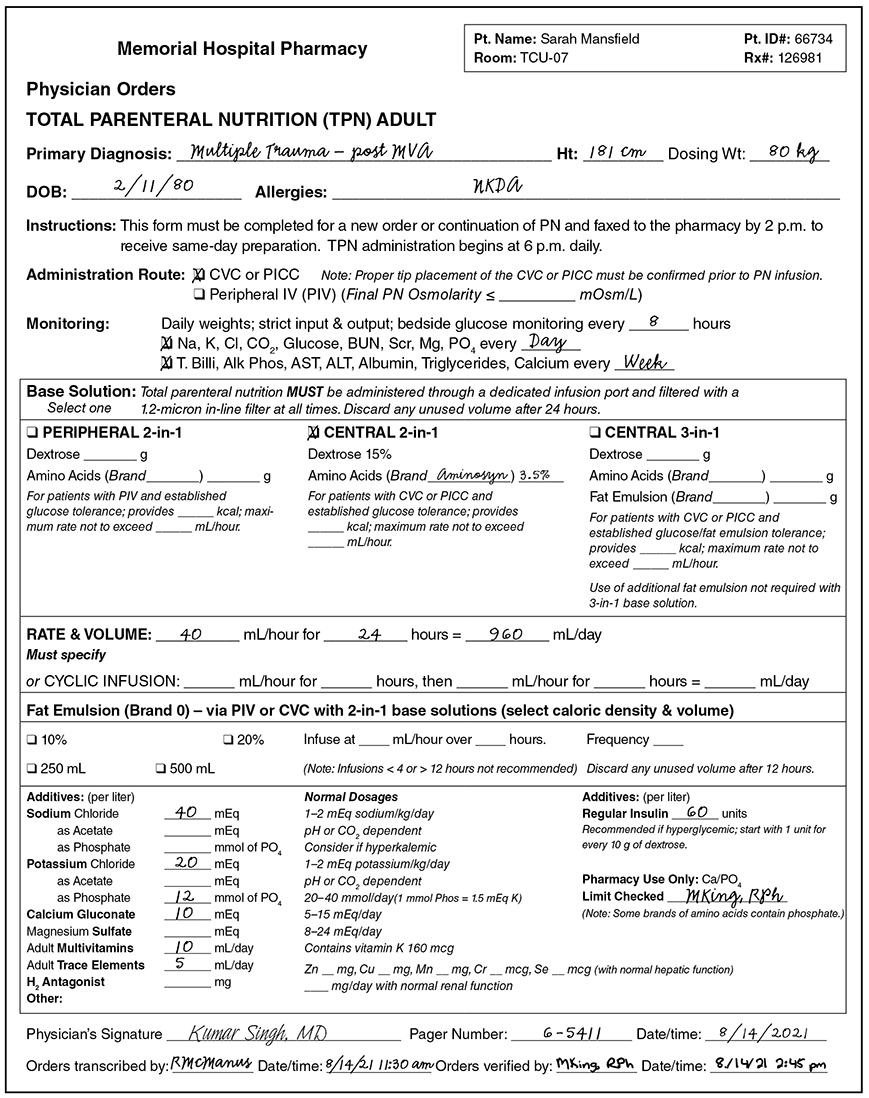
Although there are guidelines for typical adult, pediatric, and neonatal daily requirements, the components of a patient’s TPN are tailored to each patient, based on laboratory findings and clinical responses, and are often changed daily based on the patient’s vital signs and bodily responses. The healthcare team uses specialized computer order forms or sheets with a list of all common ingredients to check off. Figure 13.10 is an example of a paper TPN medication order for an adult patient, though most TPN medication orders are now done electronically.
A typical TPN solution contains many additives, including the following:
sterile water for hydration
dextrose for calories and energy (carbohydrates)
amino acids for protein synthesis
additives such as electrolytes, vitamins, minerals, and trace elements for chemical processes
fatty acids for chemical processes and energy (fatty acids may be infused separately from the TPN solution)
sometimes medication such as insulin to control blood sugar
 Pharm Fact
To avoid any kind of inflammation or infection, the nurse must also cleanse the catheter site, flush the catheter, and check the catheter site regularly during TPN administration.
2 in-1 Versus 3-in-1 TPN Solutions A TPN 2-in-1 solution contains a formulation of dextrose and amino acids with the lipid emulsion administered via piggyback in a separate bag. A total parenteral nutrition solution that contains the third component (fatty acid emulsion) in the same IV bag/bottle becomes a 3-in-1 solution. The major disadvantage of the 3-in-1 solution is that the macronutrients can change the pH of the solution and cause precipitation of some of the ingredients, which may be undetectable due to the presence of the opaque fat emulsion.
Once the IV fat emulsion (rather than solution) has been added to the IV, the 3-in-1 solution can be difficult to keep stable. These 3-in-1 preparations often have an oily surface since the fatty emulsion, which is an oil, does not blend with the water. Because of this, the 3-in-1 TPNs often lead to some vein irritation and potential infection issues.
In addition, with all the additives in the 3-in-1 TPN solution, there is some risk of physical incompatibilities and a greater risk of medication and calculation errors, especially for pediatric and neonatal patients. Some prescribers prefer to administer an IV with a carbohydrate solution like dextrose along with a premixed fat emulsion piggyback or a peripheral line IV instead of a single 3-in-1 TPN IV solution for the patient’s total nutritional needs.
 Practice Tip
TPN solutions must be administered via an IV set with an in-line filter into the subclavian vein.
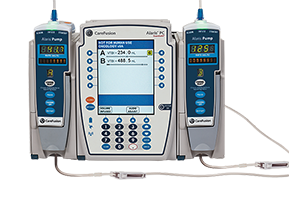
Many medications are administered using an infusion pump at the patient’s bedside; the pump accurately controls the rate of IV delivery.
Administering TPNs Administration of a TPN solution requires the insertion of a central venous catheter (CVC), also called a central line. Central lines are often inserted into the subclavian vein of the chest near the clavicle. The larger vein accommodates the hypertonic concentration of all the ingredients and the large amount of fluid (usually 2,000 mL per day) that must be diluted in the bloodstream. TPN solutions are most commonly administered continuously via an infusion pump.
Figure 13.10 Sample of a TPN Medication Order
 IN THE REAL WORLD
Children’s Hospital, a 350-bed facility in Salt Lake City, Utah, developed in-house software to electronically order TPN solutions. The prescriber initiates the order and the software does all the calculations, including patient weight and dosage, checking for any incompatibilities. If an error is detected, the software provides the user with real-time solutions. After seven years and more than 84,000 TPN orders, there were 230 errors (a lower rate than with pharmacy personnel doing the calculations of each additive). Most of the TPN errors that did occur happened during administration; all transcription errors were eliminated because of the automated software!
The IV tubing for TPNs includes a special 0.22-micron in-line filter to screen out contaminants and maintain sterility. This in-line filter and tubing must be changed every 24 hours (or per hospital policy) or with each new TPN bag (or bottle) to minimize bacterial contamination and infection. So new filters and IV sets must be sent along with the TPNs at the daily resupply rounds.
Automated Compounding Devices for Parenteral Solutions
In small hospital pharmacies, the pharmacy technician may have to perform manual sterile compounding to prepare the TPN solutions. In this time-consuming process, the technician prepares the base solution, draws up each of the various additives into separate syringes, and then injects the additives into the base solution per the prescriber’s order. Compounding the many additives of a TPN is especially time-consuming.
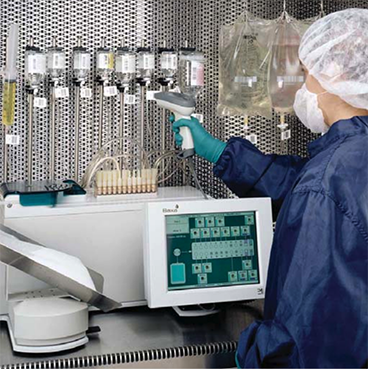
A sterile compounding technician uses an Exacta-Mix 2400 from Baxter, which is an automated compounding device that allows up to 24 ingredients to be inserted in TPN bags, producing a sterile 3 L bag in about four minutes.
In large hospitals and in many infusion compounding pharmacies for home care, an automated compounding device (ACD) is generally used. The ACD generally comes with 12 to 24 fluid ports within it that each have sterile containers of the commonly needed nutritional additives for the TPN bags. The ACD uses a pumping system calibrated with metric measurements of volume or gravity to fill the bags with the correct elements. The technician who oversees the ACD must measure each compounded bag to check that it is of the desired volume or weight. The ACD must also be checked for accuracy and correct calibration each day, both of which must be documented.
The technicians must be trained in the proper aseptic technique and ACD-filling and maintenance procedures to work with an ACD, according to the manufacturer guidelines and standards and procedures set by the USP and the American Society of Health-System Pharmacists (ASHP). If used and maintained properly, ACDs have had a better safety record than pharmacy compounding personnel.
 IN THE REAL WORLD
Using an automated compounder is not an answer for all safety questions. As reported by the Institute for Safe Medication Practices, a physician ordered a TPN for a premature infant. The physician prescribed a total of 14.7 mEq of sodium chloride and 982 mg of calcium in the infant’s TPN. The order was faxed to the pharmacy after midnight, at which time a pharmacy technician made an error entering the order into the automated compounder software. Apparently, the technician accidentally entered the prescribed dose of calcium (“982” mg) into the mEq field for sodium. The technician then prepared the TPN with a total of 982 mEq of sodium, using an automated IV compounder. The technician affixed the automated printed label to the TPN, which showed the erroneous sodium content.
Unfortunately, the error was not detected when the pharmacist checked the final product. The original order was not checked against the automated printed label, and a different label that listed the originally prescribed amount (sodium content as 14.7 mEq) was applied directly over the label produced by the automated compounder. Thus, the nurse who eventually started administration of the TPN solution was unable to detect the error.
It is very sad to say that, a few hours after the TPN was started, routine lab studies showed that the infant’s sodium level was abnormally high. The infant’s physician assumed that the study results were inaccurate and asked for the lab test to be redone. This was never accomplished before the infant experienced a cardiac arrest and died. So this reminds all to check, double-check, and triple-check the orders and labels and calculations even with ACDs.